Battery switch on travel trailer function is crucial for managing your RV’s power. Understanding how these switches work, their different types, and safe operation is essential for a smooth and safe camping experience. This guide will walk you through everything you need to know, from identifying your switch type to troubleshooting common problems.
We’ll cover various battery switch types (single-pole, double-pole, dual battery), their locations, and how to safely operate them. We’ll also explore how the battery switch interacts with other RV systems like solar panels and inverters, and address common issues and maintenance tips to keep your power system running smoothly. Get ready to become a battery switch expert!
Battery Switch Types in Travel Trailers

Choosing the right battery switch for your travel trailer is crucial for managing power and preventing electrical issues. Different types offer varying levels of control and protection, so understanding their differences is key to making an informed decision. This section will explore the common types of battery switches found in travel trailers and highlight their key features.
Single-Pole Battery Switches
Single-pole switches are the simplest type, typically used for controlling a single battery. They offer a basic on/off function, disconnecting the battery from the trailer’s electrical system when switched off. This is useful for preventing parasitic drain when the trailer is stored for extended periods. While simple and inexpensive, they lack the sophisticated control offered by more advanced switches.
They’re generally suitable for trailers with a single battery and basic electrical systems.
Double-Pole Battery Switches
Double-pole switches offer more control than single-pole switches. They control both the positive and negative terminals of the battery, providing a complete disconnection. This added safety feature helps prevent accidental shorts and electrical hazards. Double-pole switches are often preferred for their increased safety, especially when dealing with higher amperage systems. However, they are slightly more complex to install and slightly more expensive than single-pole switches.
Dual Battery Switches, Battery switch on travel trailer function
Dual battery switches are designed to manage two batteries, commonly a house battery and a starting battery. These switches typically allow for: (1) isolating both batteries completely, (2) combining both batteries for increased power, or (3) using only one battery at a time. This provides flexibility in managing power resources, ensuring adequate power for both starting the tow vehicle and powering the trailer’s appliances.
They are more complex than single-pole switches but offer superior control and power management capabilities.
Comparison of Battery Switch Types
The choice of battery switch depends largely on your trailer’s electrical system complexity and your power management needs.
| Switch Type | Number of Batteries Controlled | Amperage Rating (Typical) | Contact Material (Common) |
|---|---|---|---|
| Single-Pole | 1 | 50-100 Amps | Copper |
| Double-Pole | 1 | 50-100 Amps | Copper |
| Dual Battery | 2 | 100-200 Amps (total) | Copper or Silver-Plated Copper |
Battery Switch Location and Accessibility: Battery Switch On Travel Trailer Function
Finding your travel trailer’s battery switch quickly can be crucial in emergencies or for routine maintenance. Knowing its location and ensuring easy access are key aspects of safe and responsible RV ownership. A poorly located or inaccessible switch can lead to delays and even dangerous situations.The typical location of a battery switch varies depending on the travel trailer’s make, model, and year.
Some manufacturers place the switch inside a convenient, easily accessible compartment near the entry door or in a dedicated electrical bay. Others might locate it under the trailer, often near the tongue, requiring you to get on your hands and knees or even lie down to reach it. Less common, but still possible, is the placement inside a storage compartment, sometimes requiring the removal of stored items to access the switch.
Typical Battery Switch Locations in Travel Trailers
Common locations include near the entry door inside a dedicated panel, within an exterior compartment (often near the propane tanks or other utility connections), or under the trailer near the tongue. The accessibility of these locations varies greatly. A switch inside a well-lit, easily accessible compartment is ideal. A switch located underneath the trailer, particularly in wet or muddy conditions, presents obvious challenges.
So, you’re planning a trip? Awesome! First things first: get travel insurance. Seriously, check out Aon travel insurance – it’s a lifesaver. Then, if you’re an audiophile like me, you’ll want to plan your audiophile travel setup beforehand. Don’t forget your noise-cancelling headphones! Having the right insurance and your favorite tunes will make your trip way more enjoyable.
Consider the climate where you typically use your trailer – a switch exposed to the elements in a consistently rainy climate will degrade faster than one in a dry, covered location.
Importance of Accessible Battery Switches
Easy access to the battery switch is paramount for safety and efficient maintenance. In the event of an electrical emergency, like a short circuit or fire, quickly disconnecting the battery is crucial to prevent further damage or injury. Regular battery checks, including voltage readings and terminal cleaning, are also easier and safer when the switch is readily accessible.
Think of the scenario where a small child accidentally touches exposed wires. A readily accessible switch allows for quick action to prevent potential injury. Alternatively, a hard-to-reach switch could significantly increase the response time, escalating the danger.
Hazards of Inaccessible or Poorly-Labeled Battery Switches
Inaccessible battery switches pose several significant hazards. Delayed access during emergencies can lead to increased damage or even injuries. Furthermore, a poorly labeled or unmarked switch can lead to confusion and accidental disconnection, potentially damaging sensitive electronic equipment. Imagine a scenario where you need to quickly disconnect the battery due to a fire, but you can’t locate the switch or are unsure which switch controls the house battery.
This delay could have serious consequences. Similarly, a switch lacking clear labeling might be mistaken for another control, leading to unintentional battery disconnection.
Proper Battery Switch Operation
Safe and correct operation of your travel trailer’s battery switch is crucial for maintaining your battery’s health and preventing electrical issues. Understanding the different switch positions and following a consistent procedure will ensure a smooth and problem-free camping experience.This section details the step-by-step process for safely operating your travel trailer’s battery switch, covering various switch types and their functions.
We’ll also look at the importance of safety precautions and provide a visual representation of the operational sequence.
Battery Switch Positions and Their Functions
Different battery switches offer various positions, each serving a specific purpose. Common positions include “Off,” “Both Batteries,” “Battery 1 Only,” and “Battery 2 Only.” “Off” completely disconnects the batteries from the trailer’s electrical system, preventing discharge and protecting against accidental shorts. “Both Batteries” connects both your house battery (typically used for appliances) and your starting battery (for your tow vehicle) to the trailer’s electrical system.
“Battery 1 Only” and “Battery 2 Only” allow you to selectively power the trailer from either battery, useful for conserving power or troubleshooting. The exact labeling might vary slightly depending on your specific switch.
Step-by-Step Procedure for Operating the Battery Switch
Before operating the switch, always ensure that you are in a safe location, away from any potential hazards. It’s also a good idea to wear gloves to protect your hands from potential corrosion or grime on the switch.
- Locate the Switch: Find your battery switch. Its location varies depending on the trailer’s model, but it’s often near the batteries themselves or inside a compartment accessible from the outside of the trailer.
- Inspect the Switch: Check the switch for any signs of damage or corrosion before operating it. If you notice any issues, consult a qualified technician before proceeding.
- Select the Desired Position: Carefully turn the switch to the desired position (“Off,” “Both Batteries,” “Battery 1 Only,” or “Battery 2 Only”). Ensure the switch clicks firmly into place.
- Verify the Connection: After changing the switch position, take a moment to verify the connection. Check that your appliances or lights are working as expected, depending on the position selected. For example, if you selected “Battery 1 Only” and only your interior lights are powered from Battery 1, only those lights should be functioning.
- Turn Off When Not in Use: Always turn the switch to the “Off” position when your travel trailer is not in use or stored for extended periods. This will prevent battery drain and protect against potential electrical issues.
Flowchart for Battery Switch Operation
Imagine a simple flowchart. It would start with a box labeled “Ready to Operate Battery Switch?”. A “Yes” branch leads to a decision box asking “Desired Battery Configuration?”. This branches to four separate boxes: “Off,” “Both Batteries,” “Battery 1 Only,” and “Battery 2 Only.” Each of these boxes leads to a “Switch Set to Selected Position” box.
From there, a box labeled “Verify Connection” leads to a final box: “Operation Complete.” A “No” branch from the initial question leads to a box advising to “Consult the manual or a qualified technician.”
Troubleshooting Common Battery Switch Issues
Dealing with a malfunctioning battery switch in your travel trailer can be frustrating, but understanding common problems and their solutions can save you time and headaches. This section will guide you through diagnosing and fixing some of the most frequent issues. Remember safety first – always disconnect the battery before working on the switch.
Corrosion on Battery Switch Terminals
Corrosion is a frequent culprit in battery switch malfunctions. Over time, exposure to the elements can cause a buildup of a greenish or whitish substance on the terminals, hindering the flow of electricity. This reduces the switch’s ability to make a solid connection, leading to weak battery performance or a complete failure to power your trailer.
Addressing corrosion is crucial for maintaining a reliable power supply. Ignoring it can lead to further damage and potentially unsafe conditions.
- Clean the terminals: Use a wire brush or sandpaper to thoroughly clean the corrosion from the terminals and the switch itself. A battery terminal cleaner spray can help loosen stubborn corrosion.
- Apply dielectric grease: After cleaning, apply a thin layer of dielectric grease to the terminals. This prevents future corrosion and ensures a clean connection.
- Tighten connections: Make sure all terminal connections are securely tightened. Loose connections can contribute to corrosion buildup and poor electrical conductivity.
Loose Connections at the Battery Switch
Loose connections, whether at the battery switch itself or at the wiring leading to it, are another common problem. Vibrations from travel can loosen connections over time, leading to intermittent power or complete power loss. This can manifest as flickering lights, non-functional appliances, or a complete lack of power.
Regular inspection and tightening are key to preventing loose connections from becoming a major issue.
- Visually inspect connections: Carefully examine all connections for looseness or signs of damage. Pay close attention to the nuts and bolts securing the wires.
- Tighten connections: Use the appropriate wrench or screwdriver to tighten all connections securely. Don’t overtighten, as this can damage the terminals.
- Replace damaged wires: If you find any damaged or frayed wires, replace them immediately. Use appropriately sized wire and secure the connections properly.
Faulty Battery Switch
Sometimes, the problem isn’t loose connections or corrosion, but a faulty battery switch itself. This could be due to internal damage from wear and tear, corrosion, or simply age. Symptoms might include inconsistent power, complete power failure, or a switch that feels “sticky” or doesn’t click cleanly into place.
Replacing a faulty switch is often the most effective solution to resolve persistent power problems.
- Test the switch: If possible, use a multimeter to test the continuity of the switch in its various positions. This will help confirm if the switch is functioning correctly.
- Replace the switch: If the switch is faulty, replace it with a new one of the same type and rating. Ensure you choose a switch appropriate for the amperage of your battery system.
- Proper installation: Follow the manufacturer’s instructions carefully when installing the new switch to ensure proper functionality and safety.
Troubleshooting Guide
| Symptom | Possible Cause | Solution |
|---|---|---|
| Intermittent power | Loose connections, corrosion | Tighten connections, clean corrosion |
| Complete power failure | Faulty switch, blown fuse, dead battery | Check switch, fuses, and battery voltage |
| Weak battery performance | Corrosion, loose connections, low battery charge | Clean terminals, tighten connections, charge battery |
| Switch feels “sticky” or doesn’t click properly | Internal switch damage, corrosion | Clean switch, replace if necessary |
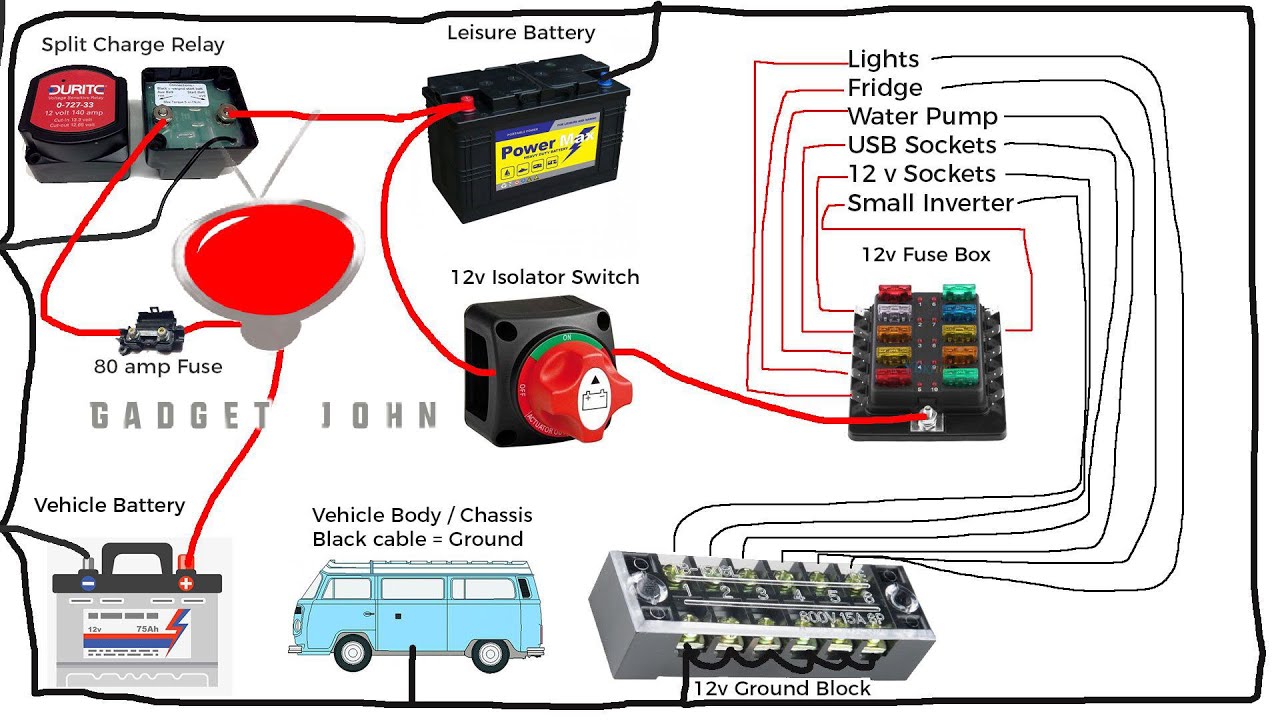
Integrating Battery Switches with Other Systems
Your travel trailer’s battery switch isn’t an isolated component; it’s a crucial link in a chain of electrical systems. Understanding how it interacts with other parts like solar panels, inverters, and converters is key to preventing problems and maximizing your off-grid power. Misusing the switch can lead to unexpected issues, from drained batteries to damaged equipment.The battery switch acts as the main on/off control for your house batteries.
It dictates which circuits receive power from those batteries, and importantly, which don’t. This means its position directly impacts the functionality of every system drawing power from your house batteries.
Solar Panel Interaction
Solar panels charge your batteries. If your battery switch is off, the solar panels still generate power, but that power has nowhere to go – it won’t charge the batteries. Some systems may have a bypass feature to allow charging even with the switch off, but this isn’t always the case. If your system doesn’t have a bypass, leaving the switch off while the sun shines will simply waste valuable solar energy.
Conversely, if the switch is in the “both” or “on” position, your solar panel system will charge the batteries and power your trailer’s electrical systems.
Inverter Interaction
Inverters convert DC power from your batteries into AC power for household appliances. With the battery switch off, your inverter will have no power source and won’t function. Turning the switch to the “on” position will allow the inverter to draw power from the house batteries and provide AC power to your appliances. Incorrect operation, such as leaving the switch off while using AC appliances, will simply lead to a non-functional inverter.
Converter Interaction
Converters transform 12V DC battery power into 120V AC power for some trailer systems. Similar to the inverter, if the battery switch is off, the converter will be powerless and unable to operate. With the switch on, the converter will function normally, powering those 120V AC circuits.
So, you’re planning a trip? Awesome! First things first: get yourself sorted with travel insurance. Check out Aon travel insurance for some solid options; you’ll be glad you did. Then, if you’re an audiophile like me, don’t forget your tunes! Planning your audiophile travel setup beforehand is key to enjoying your favorite music on the go.
Seriously, it’ll make the whole experience way better.
Battery Configuration Impacts
Using a battery switch with different battery configurations (single vs. dual) changes how you manage your power. With a single battery, the switch simply turns the battery on or off. With dual batteries, the switch usually offers positions to use one battery, both batteries, or neither. Improper use of the switch in a dual battery setup (e.g., accidentally switching off both batteries while only intending to use one) can leave you without power unexpectedly.
Understanding the specific positions and functionality of your switch for your battery configuration is crucial for preventing this.
Safety Precautions and Maintenance
Working with batteries and electrical systems in your travel trailer requires caution. Improper handling can lead to serious injury, including burns, explosions, and electric shock. Always prioritize safety when working with your battery switch and related components. Regular maintenance ensures the longevity and reliable operation of your system.Proper safety measures are paramount when dealing with the battery switch and associated wiring.
Before beginning any work, disconnect the negative terminal of your trailer battery. This prevents accidental short circuits and protects you from electrical shocks. Always wear appropriate safety glasses to protect your eyes from potential sparks or battery acid splashes. Use insulated tools to prevent accidental contact with live wires. Remember, battery acid is corrosive; wear gloves and protective clothing.
Essential Safety Precautions
Before working on your battery switch or related electrical components, always disconnect the negative (-) battery terminal. This single step significantly reduces the risk of electrical shock. When handling batteries, wear safety glasses and gloves to protect against acid splashes and potential corrosion. Never allow sparks or open flames near batteries, as hydrogen gas produced by the battery can ignite explosively.
If you smell a strong sulfur-like odor near your batteries, it could indicate a problem requiring immediate attention. Ventilate the area well, as hydrogen gas is lighter than air and will rise.
Regular Maintenance Tasks
Regular inspection and cleaning of your battery switch and its connections are vital for optimal performance and safety. Inspect all connections for corrosion and tightness. Clean any corrosion using a wire brush and baking soda solution. Tighten loose connections to ensure a secure electrical contact. Inspect the switch itself for any signs of damage or wear.
If you notice any issues, consult a qualified technician before further use. This preventative maintenance can extend the life of your battery switch and prevent unexpected problems on the road.
Correctly Wired and Maintained Battery Switch Setup
Imagine a diagram showing a battery switch positioned centrally between the trailer battery and the main electrical distribution panel. Heavy-gauge, appropriately sized wiring connects the battery to the switch, and the switch to the distribution panel. Each wire is securely fastened with appropriately sized ring terminals. The positive (+) and negative (-) wires are clearly labeled. The battery switch itself is securely mounted to a sturdy surface, away from moisture and potential damage.
A protective cover, possibly a weatherproof box, encloses the switch and its connections, shielding them from the elements and accidental contact. The entire setup is neat, organized, and easily accessible for inspection and maintenance. This example visually represents a safe and properly maintained battery switch system, prioritizing clear labeling, secure connections, and environmental protection.
Mastering your travel trailer’s battery switch is key to enjoying worry-free power on the road. By understanding the different switch types, their proper operation, and common troubleshooting steps, you can prevent frustrating power outages and ensure a safe and enjoyable camping experience. Remember to always prioritize safety and consult a professional if you’re unsure about any aspect of your RV’s electrical system.
Happy travels!
Detailed FAQs
What happens if I accidentally leave my battery switch in the “off” position?
Leaving the switch off will completely disconnect your house batteries, resulting in a power outage to all 12V appliances and systems in your trailer. You’ll lose power to lights, water pump, refrigerator (if 12V), and any other devices running off the house battery bank.
Can I use a battery switch with a solar panel system?
Yes, but proper wiring and understanding of your system are crucial. The switch should be placed
-after* the solar charge controller to prevent backfeeding. Incorrect placement could damage your controller or batteries.
How often should I check my battery switch for corrosion?
Ideally, check your battery switch connections for corrosion at least once a year, or more frequently if you’re in a humid or salty environment. Clean any corrosion immediately to prevent poor connections and potential fire hazards.
My battery switch is making a clicking sound. What’s wrong?
A clicking sound often indicates a loose connection or a faulty switch. Check all connections for tightness and corrosion. If the problem persists, the switch itself might need replacement.
